uC: PIC16F628a
Compiler: Hi-TECH PICC
Goal: To make led blink with certain frequency
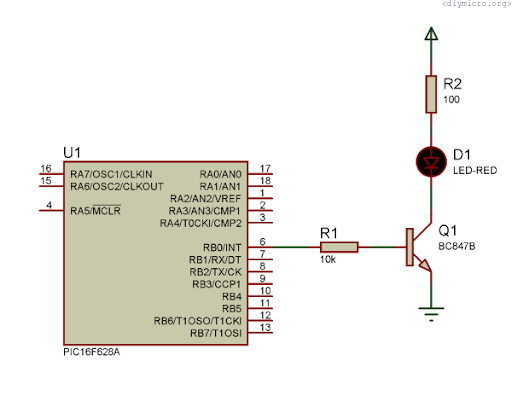
The most simple thing you can do probably and see a result immediately – to make microcontroller drive your led with certain frequency. Theoretically LED can be connected directly to uC pin, it depends from certain microcontroller, some of them can drive as much as 50mA of output power, but the most safe thing – to connect it through “driver amplifier”. Here, I used npn BC847B transistor as a common emitter amplifier, R1 serves as base current limiter, R2 as the LED current limiter. The current thru LED can be simply calculated as:
(VDD - V_d)/R_2
There can be used pnp and nMOS or pMOS transistor as well, doesn’t matter. It is just a buffer. Please notice, that Vd voltage actually depends from LED type you use, so you need to refer to the datasheet of an available part.
First of all, to make it blink with certain frequency we need to let uC know the osc frequency:
#define _XTAL_FREQ 4000000So we have 4MHz XTAL frequency and now uC knows that.
Short notice: we have the osc freq 4 MHz, then following divider by 4, so our uC resulting frequency is 1MHz. Next, a macros _delay(n) can do only 197120 cycles, so the maximum delay we can get within that macros is 197.12 ms.
As the next step, we need to configure the uC properly, it can be done with configuration setup in Hi-TECH PICC:
__CONFIG(MCLREN & UNPROTECT & WDTDIS);- MCLREN – enable reset by MCLR pin (make sure that this pin is tied properly in your circuit, otherwise the program will be a whole time in the reset
- UNPROTECT – do not protect the code, so it can be decompiled
- WDTDIS – disable watchdog, that is an extremely useful feature which usually used by everyone to check if our microcontroller is not frozen, but for that super simple piece of the code we don’t need that definitely
All right, very simple, let’s just take a look on the whole code we have:
#include <htc.h>
#define _XTAL_FREQ 4000000 // Frequency 4 MHz

// Config: ext reset, no code protect, no watchdog
__CONFIG(MCLREN & UNPROTECT & WDTDIS);

unsigned char i;  // just a variable

void main() {
    TRISB = 0x00;   // Whole B port configured as an output
    PORTB = 0x00;   // Set all B pins to 0
        for (;;)  {      // run endless for loop
        RB0 = 0;
        __delay_ms(100);  // pause 200 ms
        __delay_ms(100);

        RB0 = 1;
              // the loop to make 800ms delay
              for ( i = 0; i < 8; i++) {
              __delay_ms(100);
              }

    }

}
I would like to note that using of _delay(n) macrosses is not quite good way to program uC, rather you should use hardware timers, which are way more reliable.
Pingback: PIC мк. Эксперимент №1. Мигаем светодиодом. | PIC микроконтроллеры